|
Size: 16100
Comment: 删除对PageComment2组件的引用
|
Size: 16279
Comment:
|
| Deletions are marked like this. | Additions are marked like this. |
| Line 6: | Line 6: |
| ::-- ["zhuyj"] [[[DateTime(2008-06-06T01:37:11Z)]]] [[TableOfContents]] | ::-- [[zhuyj]] [<<DateTime(2008-06-06T01:37:11Z)>>] <<TableOfContents>> |
| Line 19: | Line 19: |
| 这段代码非常简单,它的作用只是显示一个小的窗口,然而你可以对这个窗口作很多事情。我们可以改变窗口尺寸,最大化、最小化窗口。这些需要大量的代码。有人已经将这些将这些功能编码了,因为这些在很多的程序中都是重复出现的,没有必要一次一次的重新写这些代码 | 这段代码非常简单,它的作用只是显示一个小的窗口,然而你可以对这个窗口作很多事情。我们可以改变窗口尺寸,最大化、最小化窗口。这些需要大量的代码。有人已经将这些将这些功能编码了,因为这些在很多的程序中都是重复出现的,没有必要一次一次的重新写这些代码,所以这些代码向程序员隐藏了。PyQt 是一种高层的工具集,如果我们用更底层的工具,以下的示例代码将会超过几十行。 |
| Line 83: | Line 83: |
| attachment:simple.jpg | {{attachment:simple.jpg}} |
| Line 133: | Line 133: |
| attachment:icon.jpg | {{attachment:icon.jpg}} |
| Line 179: | Line 179: |
| attachment:tooltip.jpg | {{attachment:tooltip.jpg}} |
| Line 234: | Line 234: |
| attachment:quitbutton.jpg | {{attachment:quitbutton.jpg}} |
| Line 289: | Line 289: |
| attachment:messagebox.jpg | {{attachment:messagebox.jpg}} |
| Line 343: | Line 343: |
First programs in PyQt4 toolkit
::-- zhuyj [2008-06-06 01:37:11]
Contents
1. First programs in PyQt4 toolkit
In this sections we will learn some basic functionality. The explanation will be slow, as if we would talk to a child. The first steps of a child are awkward, so are the very first attempts of a newbie programmer. Remember, there are no stupid people. There are only lazy people and people, that are not persistent enough.
- 这一部分我们将学习一些基本的功能。讲解会很详细,就像我们和孩子说话一样。孩子迈出第一步总是笨拙的,初学者的第一次尝试也是类似的。记住,没有笨人,只有懒惰的和固执的人。
1.1. Simple example
简单的例子
The code example is very simplistic. It only shows a small window. Yet we can do a lot with this window. We can resize it. Maximize it. Minimize it. This requires a lot of coding. Someone already coded this functionality. Because it repeats in most applications, there is no need to code it over again So it has been hidden from a programmer. PyQt is a high level toolkit. If we would code in a lower level toolkit, the following code example could easily have dozens of lines.
这段代码非常简单,它的作用只是显示一个小的窗口,然而你可以对这个窗口作很多事情。我们可以改变窗口尺寸,最大化、最小化窗口。这些需要大量的代码。有人已经将这些将这些功能编码了,因为这些在很多的程序中都是重复出现的,没有必要一次一次的重新写这些代码,所以这些代码向程序员隐藏了。PyQt 是一种高层的工具集,如果我们用更底层的工具,以下的示例代码将会超过几十行。
Here we provide the necessary imports. The basic GUI widgets are located in QtGui module.
- 这里我们进行必须的引用。GUI基础插件在这里引入。
app = QtGui.QApplication(sys.argv)
Every PyQt4 application must create an application object. The application object is located in the QtGui module. The sys.argv parameter is a list of arguments from the command line. Python scripts can be run from the shell. It is a way, how we can control the startup of our scripts.
每一个PyQT4应用必须创建一个应用对象。应用对象放在QtGui模块中。sys.argv参数是从命令行返回的一个参数列表。Python脚本可以从shell来运行。这是一个我们控制我们的脚本启动方式的方法。
widget = QtGui.QWidget()
The QWidget widget is the base class of all user interface objects in PyQt4. We provide the default constructor for QWidget. The default constructor has no parent. A widget with no parent is called a window.
- QWidget插件是PyQT4中所有用户接口对象的基类。我们为QWidget提供了缺省的构造程序。缺省的构造程序没有父类。一个没有父类的插件叫做一个窗口。
widget.resize(250, 150)
The resize() method resizes the widget. It is 250px wide and 150px high.
- resize()方法可以调整插件的尺寸。这里是250px宽,150px高。
widget.setWindowTitle('simple')Here we set the title for our window. The title is shown in the titlebar.
- 这里我们指定我们窗口的标题。标题在标题栏里显示。
widget.show()
The show() method displays the widget on the screen.
- show() 方法将插件显示在屏幕上。
sys.exit(app.exec_())
Finally, we enter the mainloop of the application. The event handling starts from this point. The mainloop receives events from the window system and dispatches them to the application widgets. The mainloop ends, if we call the exit() method or the main widget is destroyed. The sys.exit() method ensures a clean exit. The environment will be informed, how the application ended.
- 最终,我们进入应用的主循环。事件处理从这里开始。主循环从窗口系统接受事件并把他们分发到应用插件中。当我们调用exit()方法或者主插件被销毁时,主循环结束。sys.exit()方法确保一个干净的结束。环境参数中可以体现出应用程序是如何结束的。
You wonder why the exec_() method has the underscore? Everything has a meaning. This is obviously because the exec is a python keyword. And thus, exec_() was used instead.
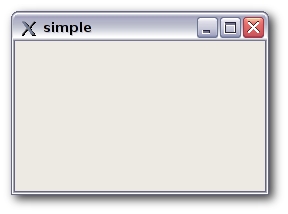
- 你可能觉得奇怪为什么exec_()方法带下划线?每件事情都是有原因的。这显然是因为exec是一个python的关键字。所以,就用exec_()来替代了。 Simple
 Figure: Simple
1.2. An application icon
The application icon is a small image, which is usually displayed in the top left corner of the titlebar. In the following example we will show, how we do it in PyQt4. We will also introduce some new methods.
- 程序图标是一个经常显示在标题栏顶端左面的小的图片。下面的例子我们将要展示在PyQT4里我们是如何作的。我们也会介绍一些新的方法。
   1 #!/usr/bin/python
   2
   3 # icon.py
   4
   5 import sys
   6 from PyQt4 import QtGui
   7
   8
   9 class Icon(QtGui.QWidget):
  10     def __init__(self, parent=None):
  11         QtGui.QWidget.__init__(self, parent)
  12
  13         self.setGeometry(300, 300, 250, 150)
  14         self.setWindowTitle('Icon')
  15         self.setWindowIcon(QtGui.QIcon('icons/web.png'))
  16
  17
  18 app = QtGui.QApplication(sys.argv)
  19 icon = Icon()
  20 icon.show()
  21 sys.exit(app.exec_())
The previous example was coded in a procedural style. Python programming language supports both procedural and object oriented programming styles. Programming in PyQt4 means programming in OOP.
- 上面的例子是函数风格。Python程序语言支持面向函数和面向对象两种风格。PyQT4中变成意味着面向对象程序设计。
 class Icon(QtGui.QWidget):
     def __init__(self, parent=None):
         QtGui.QWidget.__init__(self, parent)
The three most important things in object oriented programming are classes, data and methods. Here we create a new class called Icon. The Icon class inherits from QtGui.QWidget class. This means, that we must call two constructors. The first one for the Icon class and the second one for the inherited class.
面向对象程序设计中三个最重要的事情是类,数据和方法。这里我们创建一个新类叫Icon。Icon类继承自QtGui.Qwidget类。这意味着,我们必须调用两次初始化。一次是Icon类的,另一次是父类的。
 self.setGeometry(300, 300, 250, 150)
 self.setWindowTitle('Icon')
 self.setWindowIcon(QtGui.QIcon('icons/web.png'))
All three classes have been inherited from the QtGui.QWidget class. The setGeometry() does two things. It locates the window on the screen and sets the size of the window. The first two parameters are the x and y positions of the window. The third is the width and the fourth is the height of the window. The last method sets the application icon. To do this, we have created a QIcon object. The QIcon receives the path to our icon to be displayed.
所有的三个类都从QtGui.QWidget类继承。setGeometry()函数做两件事情。它在屏幕上定位窗口,设置窗口尺寸。头两个参数是窗口的x和y位置。第三个是窗口的宽度,第四个是高度。最后一个方法设置程序的图标。为了做到这样,我们创建了一个QIcon对象。QIcon 接受我们要显示的图标文件的路径。 Icon
![]() Figure: Icon
Figure: Icon
1.3. Showing a tooltip
We can provide a balloon help for any of our widgets.
- 我们可以为我们的组件提供浮动帮助。
   1 #!/usr/bin/python
   2
   3 # tooltip.py
   4
   5 import sys
   6 from PyQt4 import QtGui
   7 from PyQt4 import QtCore
   8
   9
  10 class Tooltip(QtGui.QWidget):
  11     def __init__(self, parent=None):
  12         QtGui.QWidget.__init__(self, parent)
  13
  14         self.setGeometry(300, 300, 250, 150)
  15         self.setWindowTitle('Tooltip')
  16
  17         self.setToolTip('This is a <b>QWidget</b> widget')
  18         QtGui.QToolTip.setFont(QtGui.QFont('OldEnglish', 10))
  19
  20
  21 app = QtGui.QApplication(sys.argv)
  22 tooltip = Tooltip()
  23 tooltip.show()
  24 app.exec_()
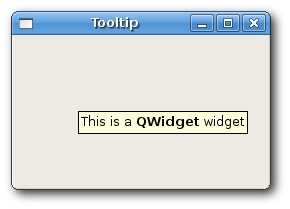
In this example, we show a tooltip for a QWidget widget.
- 这个例子里,我们为QWidget组件显示工具提示。
self.setToolTip('This is a <b>QWidget</b> widget')To create a tooltip, we call the setTooltip() method. We can use rich text formatting.
- 为了创建一个tooltip,我们调用setTooltip() 方法。我们可以利用rich文本格式化。
QtGui.QToolTip.setFont(QtGui.QFont('OldEnglish', 10))Because the default QToolTip font looks bad, we change it.
- 因为缺省的QToolTip字体看起来很糟,我们换一个。 Tooltip
 Figure: Tooltip
1.4. Closing a window
关闭窗口 The obvious way to how to close a window is to click on the x mark on the titlebar. In the next example, we will show, how we can programatically close our window. We will briefly touch signals and slots.
- 关闭一个窗口最常用的方法是点击标题栏上的x标志。在下一个例子里,我们将会展示我们如何编程来关闭窗口。我们还会简单接触信号和槽的概念。
The following is the constructor of a QPushButton, that we will use in our example.
- 下面的是一个QPushButton的构造程序,我们将会在我们的例子中用到它。
QPushButton(string text, QWidget parent = None)
The text parameter is a text that will be displayed on the button. The parent is the ancestor, onto which we place our button. In our case it is QWidget.
- text参数是将要在按钮上显示的文字。parent是我们放置按钮的父窗口,这里是 QWidget。
   1 #!/usr/bin/python
   2
   3 # quitbutton.py
   4
   5 import sys
   6 from PyQt4 import QtGui, QtCore
   7
   8
   9 class QuitButton(QtGui.QWidget):
  10     def __init__(self, parent=None):
  11         QtGui.QWidget.__init__(self, parent)
  12
  13         self.setGeometry(300, 300, 250, 150)
  14         self.setWindowTitle('Icon')
  15
  16         quit = QtGui.QPushButton('Close', self)
  17         quit.setGeometry(10, 10, 60, 35)
  18
  19         self.connect(quit, QtCore.SIGNAL('clicked()'),
  20             QtGui.qApp, QtCore.SLOT('quit()'))
  21
  22
  23 app = QtGui.QApplication(sys.argv)
  24 qb = QuitButton()
  25 qb.show()
  26 sys.exit(app.exec_())
  27
  28  quit = QtGui.QPushButton('Close', self)
  29  quit.setGeometry(10, 10, 60, 35)
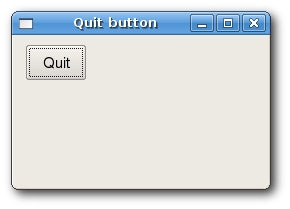
We create a push button and position it on the QWidget just like we have positioned the QWidget on the screen.
- 我们生成了一个按钮并把它显示在了QWidget上,就像我们把QWidget显示到屏幕上一样。
 self.connect(quit, QtCore.SIGNAL('clicked()'),
     QtGui.qApp, QtCore.SLOT('quit()'))
The event processing system in PyQt4 is built with the signal & slot mechanism. If we click on the button, the signal clicked() is emitted. The slot can be a PyQt slot or any python callable. The QtCore.QObject.connect() method connects signals with slots. In our case the slot is a predefined PyQt quit() slot. The communication is done between two objects. The sender and the receiver. The sender is the push button, the receiver is the application object.
PyQT4的事件处理系统由信号和插槽组成。如果我们点击按钮,就会送出clicked()信号。插槽可以是PyQT槽或者任何python调用。QtCore.QObject.connect() 方法将信号和槽连接起来。于是发送者和接收者两个对象间就可以通信了。发送者是按钮,接收者是应用对象。 quit button
 Figure: quit button
1.5. Message Box
By default, if we click on the x button on the titlebar, the QWidget is closed. Sometimes we want to modify this default behaviour. For example, if we have a file opened in an editor to which we did some changes. We show a message box to confirm the action.
- 缺省的我们点击标题栏上的x按钮,QWidget就退出了,有时我们想改变缺省的行为。比如,如果我们的编辑器里有一个修改过的文件,我们需要显示一个对话框来确认关闭的操作。
   1 #!/usr/bin/python
   2
   3 # messagebox.py
   4
   5 import sys
   6 from PyQt4 import QtGui
   7
   8
   9 class MessageBox(QtGui.QWidget):
  10     def __init__(self, parent=None):
  11         QtGui.QWidget.__init__(self, parent)
  12
  13         self.setGeometry(300, 300, 250, 150)
  14         self.setWindowTitle('message box')
  15
  16
  17     def closeEvent(self, event):
  18         reply = QtGui.QMessageBox.question(self, 'Message',
  19             "Are you sure to quit?", QtGui.QMessageBox.Yes, QtGui.QMessageBox.No)
  20
  21         if reply == QtGui.QMessageBox.Yes:
  22             event.accept()
  23         else:
  24             event.ignore()
  25
  26 app = QtGui.QApplication(sys.argv)
  27 qb = MessageBox()
  28 qb.show()
  29 sys.exit(app.exec_())
If we close the QWidget, the QCloseEvent is generated. To modify the widget behaviour we need to reimplement the closeEvent() event handler.
- 如果我们关闭QWidget,就会产生QCloseEvent事件。为了改变widget的行为,我们需要改变closeEvent()事件的处理。
 reply = QtGui.QMessageBox.question(self, 'Message',
     "Are you sure to quit?", QtGui.QMessageBox.Yes, QtGui.QMessageBox.No)
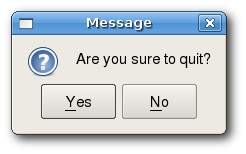
We show a message box with two buttons. Yes and No. The first string appears on the titlebar. The second string is the message text displayed by the dialog. The return value is stored in the reply variable.
- 我们显示一个有Yes和No两个按钮的提示框。第一个串显示在标题栏上。第二个串是对话框的信息提示。返回值保存在返回变量中。
 if reply == QtGui.QMessageBox.Yes:
     event.accept()
 else:
    event.ignore()
Here we test the return value. If we clicked Yes button, we accept the event which leads to the closure of the widget and to the termination of the application. Otherwise we ignore the close event.
- 这里我们测试返回值。如果点击了Yes按钮,我们就接受关闭widget并且退出程序的事件。否则我们就忽略关闭事件。 message box
 Figure: message box
1.6. Centering window on the screen
The following script shows, how we can center a window on the desktop screen.
- 下面的脚本显示了如何将一个窗口放到桌面的正中。
   1 #!/usr/bin/python
   2
   3 # center.py
   4
   5 import sys
   6 from PyQt4 import QtGui
   7
   8
   9 class Center(QtGui.QWidget):
  10     def __init__(self, parent=None):
  11         QtGui.QWidget.__init__(self, parent)
  12
  13         self.setWindowTitle('center')
  14         self.resize(250, 150)
  15         self.center()
  16
  17     def center(self):
  18         screen = QtGui.QDesktopWidget().screenGeometry()
  19         size =  self.geometry()
  20         self.move((screen.width()-size.width())/2, (screen.height()-size.height())/2)
  21
  22
  23 app = QtGui.QApplication(sys.argv)
  24 qb = Center()
  25 qb.show()
  26 sys.exit(app.exec_())
self.resize(250, 150)
Here we resize the QWidget to be 250px wide and 150px heigh.
- 这里我们将QWidget改变为250px宽,150px高。
screen = QtGui.QDesktopWidget().screenGeometry()
We figure out the screen resolution of our monitor.
- 我们计算我们监视器的屏幕分辨率。
size = self.geometry()
Here we get the size of our QWidget.
- 这里我们获得我们QWidget的尺寸。
self.move((screen.width()-size.width())/2, (screen.height()-size.height())/2)
Here we move the window to the center of the screen.
- 这里我们将窗口放到屏幕的正中。
